Write An AI Chatbot With Node.js & The ChatGPT API
Jun 29, 2023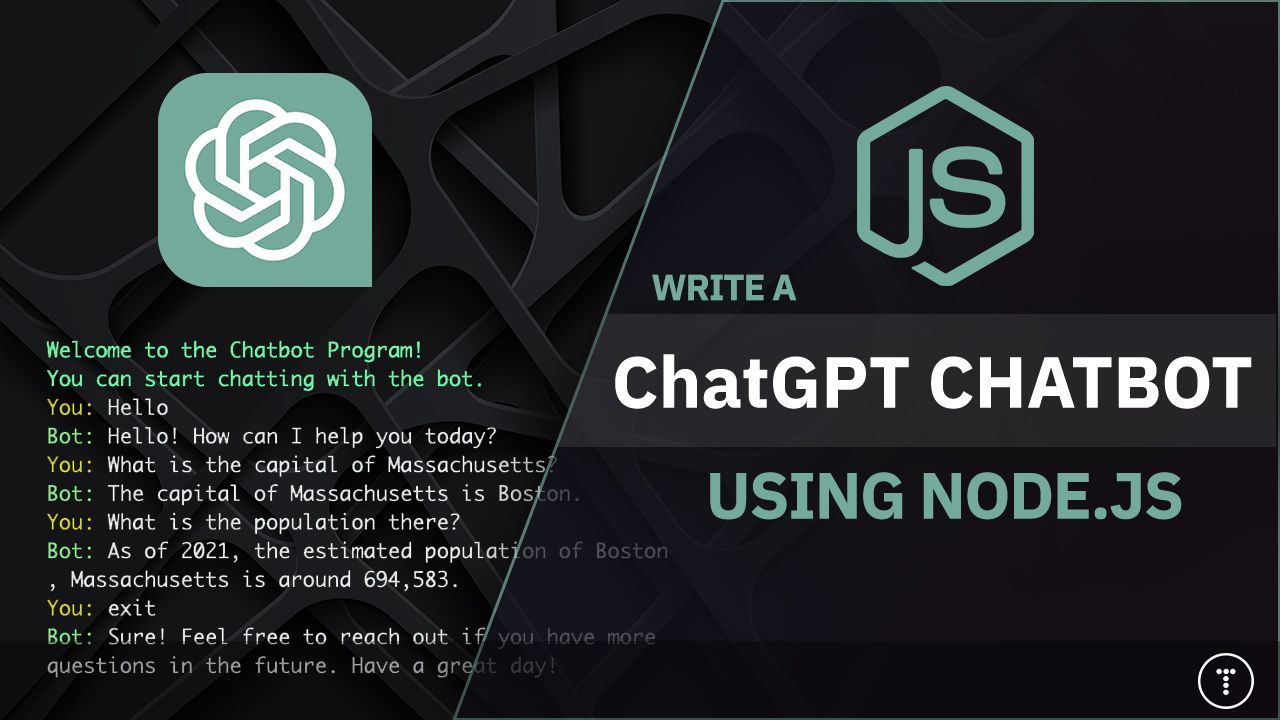
In this article, we are going to utilize the ChatGPT API to create a chatbot with Node.js. It will be powered by the GPT-3.5 Turbo model. This will be a general chatbot that can talk about anything. It will be able to answer questions, generate code, tell jokes, and much more. It's essentially ChatGPT, but within your own application with a Node.js wrapper. You'll be able to chat right within your terminal. This can come in handy because you can just keep your terminal open and chat with the bot whenever you want. You can also use this as a base to create your own chatbot. Also, there are awesome new features related to the OpenAI APIs being created all of the time, such as function calls. I will use this project as a starting point to demonstrate some of that stuff in the future. Let's get started with our chatbot!
Prerequisites
Before we get started, you'll need to have a few things installed. You'll need to have Node.js installed. You can download it here.
You also need a ChatGPT API key. You can get one here. You can get 1000 free requests per month. If you need more, you can upgrade to a paid plan.
Getting Started
We are going to learn how to use the Open AI package for Node.js before we create the chatbot. This will make it easier to understand what is going on when we create the chatbot.
First, we need to create a new Node.js project. Open up your terminal and run the following commands:
mkdir chatgpt-chatbot
cd chatgpt-chatbot
npm init -y
As far as dependencies, we will need the following:
- openai - The official OpenAI API wrapper for Node.js.
- readline - A Node.js module that provides an interface for reading data from a Readable stream (such as process.stdin) one line at a time.
- dotenv - A Node.js module that loads environment variables from a .env file into process.env.
- colors - A Node.js module that provides a simple way of adding color to your terminal output. Of course, this is optional, but it makes the output look nicer.
Install the dependencies by running the following command:
npm install openai readline dotenv colors
ES Modules
I prefer to use ES Modules in Node.js. To do so, just open the package.json file and add the following:
"type": "module"
That's it. Now you can use ES Modules in your project. Just remember that if you import your own files, you need to add the .js extension. For example, if you have a file called chatbot.js, you would import it like this:
import { chatbot } from './chatbot.js';
If you leave off the .js extension, you will get an error.
Add Your API Key
We are going to store our API key in a .env file. Create a new file called .env and add the following:
OPENAI_API_KEY=YOUR_API_KEY
We should also create a .gitignore file and add the .env to it so that when the project is pushed to GitHub or anywhere else, your key doesn't go wit it.
Create a new file called .gitignore and add the following:
node_modules
.env
Using the OpenAI Package
Let's look at how to use the OpenAI package and the Completions API. First, we need to import a few things from the package. We also want to import the dotenv package and run the config() method on the to load the environment variables from the .env file into process.env.
import { Configuration, OpenAIApi } from 'openai';
import dotenv from 'dotenv';
dotenv.config();
Next, we need to create our configuration with the API key and then create a new instance of the OpenAIApi class.
const configuration = new Configuration({
  apiKey: process.env.OPENAI_API_KEY,
});

const openai = new OpenAIApi(configuration);
Now we can use the openai instance to call the Completions API. We can send any text we want and we will get the same response as if we were using ChatGPT. Let's try it out.
const chatCompletion = await openai.createChatCompletion({
  model: 'gpt-3.5-turbo',
  messages: [
    { role: 'user', content: 'What is the capital of Massachusetts?' },
  ],
});
Here, we are sending the message "What is the capital of Massachusetts?" to the API. We are using the gpt-3.5-turbo model. This is the same model that ChatGPT uses. We are also specifying the role as "user". This is important because the API will respond differently depending on the role.
Let's print out what we get back. We want the data object:
console.log(chatCompletion.data);
To run the file, you can run node index.js in your terminal, but we should probably add a script to the package.json file. Open up the package.json file and add the following:
"scripts": {
  "start": "node index.js"
}
Now run the following command in your terminal:
npm start
You will see something like this:
data: {
    id: 'chatcmpl-7WSNhqrMVdr7vtt32o5PhYGgYrkU3',
    object: 'chat.completion',
    created: 1687969949,
    model: 'gpt-3.5-turbo-0613',
    choices: [ [Object] ],
    usage: { prompt_tokens: 14, completion_tokens: 11, total_tokens: 25 }
  }
The choices property contains the response from the API. It is an array with one item. Let's print that out:
console.log(chatCompletion.choices[0].text);
Now you will see something like this:
{
  index: 0,
  message: {
    role: 'assistant',
    content: 'The capital of Massachusetts is Boston.'
  },
  finish_reason: 'stop'
}
so the actual response is in the message.content property. Let's print that out:
console.log(chatCompletion.choices[0].message.content);
Now you should just get the response:
The capital of Massachusetts is Boston.
Notice that the role is "assistant". We are the "user" and the API is the "assistant". There are other roles as well, such as "system".
The index property is the index of the message in the messages array that we sent to the API. Since we only sent one message, the index is 0. If we sent more than one message, the index would be different.
You can read more about the Completions API and parameters here.
Creating the Chatbot
So that was a little crash course on how to use the OpenAI package with the completions API. Now let's create our chatbot.
I want to put the config and instantiation of the OpenAIApi class in a separate file. Create a new folder called config and in that, a file called openai.js and add the following:
import { Configuration, OpenAIApi } from 'openai';
import dotenv from 'dotenv';
dotenv.config();

const configuration = new Configuration({
  apiKey: process.env.OPENAI_API_KEY,
});

const openai = new OpenAIApi(configuration);

export default openai;
Now, if we want to use the OpenAI package, we can just import the openai variable from this file.
In the index.js file, we want to import the openai variable as well as the readline-sync and colors packages:
import openai from './config/open-ai.js';
import readlineSync from 'readline-sync';
import colors from 'colors';
readlineSync
The readline-sync package is a synchronous version of the readline package. It is easier to use for our purposes. This allows us to get input from the user and do what we want with it.
Let's look at a quick example. Add the following:
const userName = readlineSync.question('May I have your name? ');
console.log('Hi ' + userName + '!');
Now run the file with npm start and you will see something like this:
May I have your name? John
Hi John!
main() Function
We call the api asynchronously, so we need to use the async keyword. We also need to use the await keyword when we call the api. So let's create an async function called main() and call it at the end of the file:
async function main( ) {
  // code here
}

main();
From now on, all of our code will go in this function. Let's start with a greeting. We will make these prompts stand out by making them bold and green. We will use the colors package for this. Add the following:
async function main( ) {
  console.log(colors.bold.green('Welcome to the Chatbot Program!'));
  console.log(colors.bold.green('You can start chatting with the bot.'));
}

main();
You can run the file with npm start and you will see the following:
Welcome to the Chatbot Program!
You can start chatting with the bot.
While Loop
We want to keep asking the user for input until they type "quit". We can do this with a while loop. Add the following under the console.logs in the main function:
while (true) {
  // Get input from the user
  const userInput = readlineSync.question(colors.yellow('You: '));
}
Run the file and you should see a prompt with the text "You: ". You can type something and hit enter, but nothing will happen. We need to add some code to handle the input. use Ctrl + C to exit the program for now.
Let's add a way to escape the while loop. We are also going to put the rest of the code in a trycatch block. Add the following under the userInput variable:
try {
  if (userInput.toLowerCase() === 'exit') {
    console.log(colors.green('Bot: ') + completionText);
    return;
  }
} catch (error) {
  console.log(colors.red('Error: ') + error);
}
Now it still will not do much, but if you type "exit" and hit enter, it will exit the program.
Integrate OpenAI
Now we want to use the completions API that we looked at earlier. We want to send the user input to the API and get the response. Add this at the top of the try block before the if statement:
const completion = await openai.createChatCompletion({
  model: 'gpt-3.5-turbo',
  messages: [{ role: 'user', content: userInput }],
});

const completionText = completion.data.choices[0].message.content;
We are sending the user input to the API.
The last thing we want to do is print out the response from the API. Add the following under the if statement at the very bottom of the try block:
console.log(colors.green('Bot: ') + completionText);
Now run the file with npm start and you should see something like this:
Welcome to the Chatbot Program!
You can start chatting with the bot.
You: Hello
Bot: Hi, how are you?
You: What is the capital of Massachusetts?
Bot: The capital of Massachusetts is Boston.
...
You can now chat with your bot. You can type "exit" to exit the program.
Remembering Context
So this seems to work, but after asking the capital, try asking this:
You: What is the population there?
It will not know what you are talking about because the chat history and context is not being sent to the API. We need to send the chat history to the API. We can do this by adding the chatHistory. Change the file to the following:
import openai from './config/open-ai.js';
import readlineSync from 'readline-sync';
import colors from 'colors';

async function main( ) {
  console.log(colors.bold.green('Welcome to the Chatbot Program!'));
  console.log(colors.bold.green('You can start chatting with the bot.'));

  const chatHistory = []; // Store the conversation history

  while (true) {
    const userInput = readlineSync.question(colors.yellow('You: '));

    try {
      // Construct the messages array by iterating over the history array
      const messages = chatHistory.map(([role, content]) => ({
        role,
        content,
      }));

      // Add the latest user input to the messages array
      messages.push({ role: 'user', content: userInput });

      const completion = await openai.createChatCompletion({
        model: 'gpt-3.5-turbo',
        messages: messages,
      });

      const completionText = completion.data.choices[0].message.content;

      if (userInput.toLowerCase() === 'exit') {
        console.log(colors.green('Bot: ') + completionText);
        return;
      }

      console.log(colors.green('Bot: ') + completionText);

      // Update the chatHistory with the user input and assistant's response
      chatHistory.push(['user', userInput]);
      chatHistory.push(['assistant', completionText]);
    } catch (err) {
      console.log(colors.red(err));
    }
  }
}

// Run the main function
main();
Now try and ask the capital and then the population. It should work.
We first initialized a chatHistory array. Then we used map to construct the messages array by iterating over the history. We then add the latest user input to messages, Finally, at the bottom, we update the chatHistory array with the user input and assistant.bot response.
That's it! We now have a working ChatGPT bot.
There are so many things that you could do to enhance this little application, but this is a good start.
You could keep it the way it is and just run npm start in the project folder to run the program. You could also create a global npm package so that you can run it from anywhere. You could even use something like Electron to create a desktop app. The possibilities are endless.
The code for this project is available here
Stay connected with news and updates!
Join our mailing list to receive the latest news and updates from our team.
Don't worry, your information will not be shared.
We hate SPAM. We will never sell your information, for any reason.
