MERN Crash Course (Part 1) - Backend API, Middleware, Database, JWT & HTTP-Only Cookie
May 15, 2023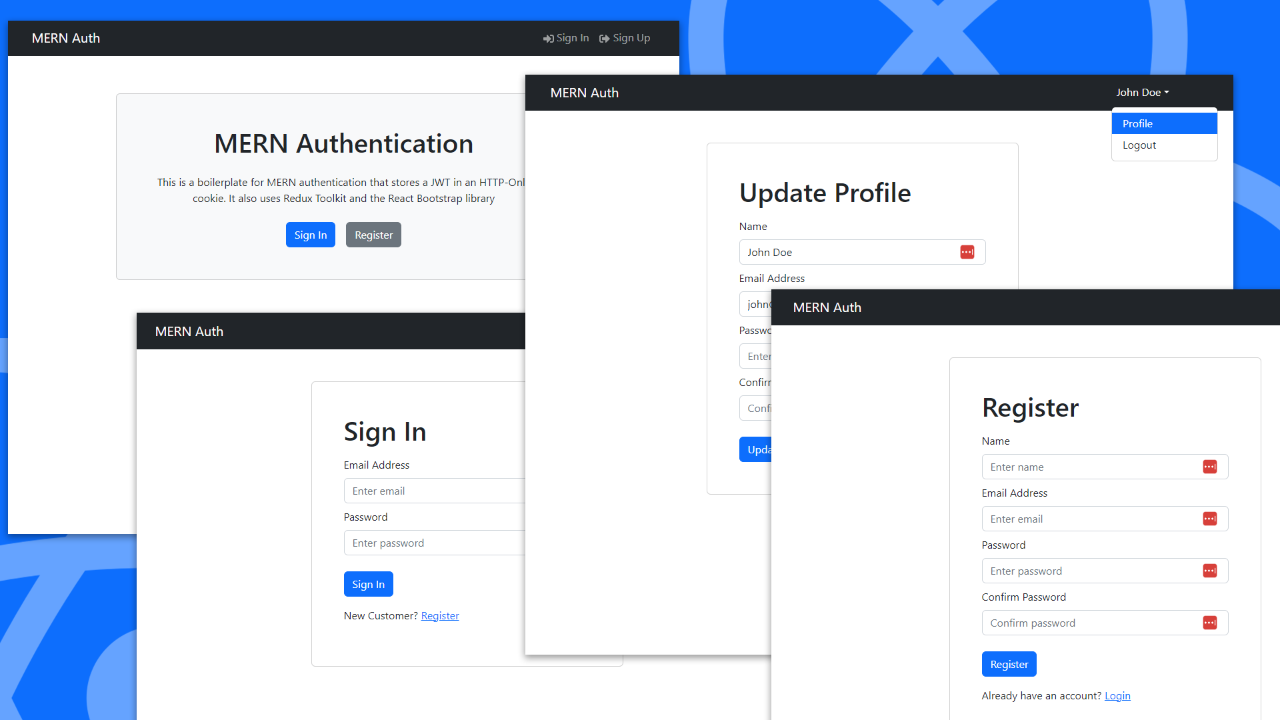
In this article, we will create a MERN stack application from absolute scratch. The video for this project can be found here. This will be a single-page application on the frontend using React, Redux, React Router and React Bootstrap. The backend will use Express, MongoDB and Mongoose for the database and will implement authentication using JWT (JSON Web Tokens) and HTTP-only cookies. We will also be using Redux for state management and Redux Toolkit for making things easier. There will be 2 parts to this MERN course article. In the first part, we will create the backend and in the second part, we will create the frontend.
The main focus of this project is to get authentication setup. It gives you a good understanding of creating routes/controllers in the api and then managing state in React/Redux.
This is the same method that we used in my MERN Stack From Scratch course. If you are interested in this as well as building a complete eCommerce application, check out the course.
In the video version of this article, we deploy this project to Linode. We've been working with Linode for years now and they're my go-to for any project where I want complete control of my server. You can install and customize everything down to the actual operating system. They also have a ton of one-click apps and stacks to get you up and running quickly.
Here is a link that will give you $100 free over 60 days: https://www.linode.com/traversy. You can use this to deploy this project or any other project that you want. I have a GitHub Gist file here with the steps if you don't want to watch the video.
All code for this project can be found in this GitHub repo.
Alright, so let's get started with this MERN crash course.
Before we begin, I just want to mention that there are so many ways to implement authentication in a MERN stack application. There are 3rd party services like Auth0 and Firebase that make it very easy. There are also many different libraries and packages that can be used, such as Passport.js. I wanted to do it this way because it is very barebones and doesn't require any 3rd party services or libraries aside from the jsonwebtokens package. It's also a great learning experience.
The way that this will work is that we will have a route to authenticate and validate our email and password. Once that's validated, we'll create a JSON Web Token and send it back to the client in an HTTP-only cookie. We'll also have a route to register a user, a route to get the user's profile and a route to update the user's profile. We'll also have a route to logout the user and clear the cookie.
Getting Started
As with most projects that I do, I like to start from scratch. We will start with the backend and get our database setup as well as our routes, models and controllers. We will create some authenitcation middleware and the end result should be fully functional login and registration that will save a JWT in an HTTP-only cookie. Once we do that, we can move to the frontend and create our React app.
Backend Setup
Let's initialize a new project and install our dependencies. I am going to create a new directory called mern-auth and then run npm init -y to initialize a new project with default settings. Then open it up with VS Code.
mkdir mern-auth
cd mern-auth
npm init -y
code .
All of our server dependencies will get installed in this directory. Let's install Express, Mongoose, bcryptjs, jsonwebtoken and cookie-parser.
npm i express dotenv mongoose bcryptjs jsonwebtoken cookie-parser
Here is a rundown of these packages:
- Express - Web framework for Node.js
- dotenv - Loads environment variables from a .env file
- mongoose - MongoDB object modeling tool
- bcryptjs - Library for hashing and salting user passwords
- jsonwebtoken - Library for generating JWTs
- cookie-parser - Middleware for parsing cookies
We will have a directory called backend that will contain our server side code. The entry point will be backend/server.js Let's create that now.
mkdir backend
touch backend/server.js
Let's setup a very basic Express server in backend/server.js and get it running.
const express = require('express');
const port = 5000;

const app = express();

app.get('/', (req, res) => res.send('API running'));

app.listen(port, () => console.log(`Server started on port ${port}`));
We could run our server with node backend/server.js but we want to use nodemon so that we don't have to restart the server every time we make a change. Let's install that as a dev dependency.
npm i -D nodemon
Now, let's add some NPM Scripts to our package.json file.
"scripts": {
  "start": "node backend/server.js",
  "server": "nodemon backend/server.js"
},
Now we can run npm run server to start the server. We should see the message "API running" in the browser at http://localhost:5000. 'npm start` will be used in production.
Install Postman
We will be using Postman to test our API. If you don't have it installed, go to https://www.postman.com/downloads/ and download the version for your OS.
You can test the API by making a GET request to http://localhost:5000 in Postman and you should see the message "API running".
ES Modules
I like to use ES Modules in my Node.js projects over CommonJS. It's a newer syntax that is more readable and easier to work with. It's also the syntax that we will be using in the frontend React app. To use it, we can just add the following to the package.json file.
"type": "module",
Now, change the Express import in server.js to the following:
import express from 'express';
Your server should still work.
Envitonment Variables
I want to create a file to store enviroment variables, which are basically variables that we don't want to be hard coded into our code. Things like database credentials, API keys, etc. We will be using the dotenv package to do this.
Let's create a file named .env in the root of our project and add the following:
NODE_ENV=development
PORT=5000
You should also add this file to your .gitignore file so that it doesn't get pushed to GitHub. Create a file in the root called .gitignore and add the following:
node_modules
.env
Now in the server.js file, we can import the dotenv package and use it to load our environment variables.
import dotenv from 'dotenv';
dotenv.config();
Now change the port to use the environment variable.
const port = process.env.PORT || 5000;
Restart the server and now, it should be using the port from the .env file. You can change the number to something else to test it.
User Routes and Controller
Let's get our routes setup. We will have the following routes:
- POST /api/users - Register a user
- POST /api/users/auth - Authenticate a user and get token
- POST /api/users/logout - Logout user and clear cookie
- GET /api/users/profile - Get user profile
- PUT /api/users/profile - Update profile
Let's start by creating a routes directory in backend and then create a file called userRoutes.js in there. This will contain all of our user routes.
We could have all of the route logic in this file, but it's better to separate it out into a controller. Let's create a controllers directory in backend and then create a file called userController.js in there.
Let's start by creating a single controller function and connect it to a route, just to get things going. In userController.js add the following code.
// @desc    Auth user & get token
// @route   POST /api/users/auth
// @access  Public
const authUser = (req, res) => {
  res.json({ message: 'Success' });
};

export { authUser };
I like to put a comment at the top of each controller function that describes what it does, the route and the access level. Of course, this is optional.
We are just sending back a JSON response with a message of "Success". Now, let's connect this to a route. In userRoutes.js add the following code.
import express from 'express';
const router = express.Router();
import { authUser } from '../controllers/userController.js';

router.route('/auth').post(authUser);

export default router;
We are importing the authUser function from userController.js and connecting it to the route POST /api/users/auth. Now, let's bring this into server.js and connect it to the /api/users route.
import userRoutes from './routes/userRoutes.js';

app.use('/api/users', userRoutes);
Test the Route
Open Postman or any HTTP client and make a POST request to http://localhost:5000/api/users/auth. You should see the JSON response with the message "Success".
Using an Async Handler
We will be using async/await for our controller functions. We could use try/catch blocks in each function, but that would be repetitive. Instead, we will create a function that will wrap around each controller function and handle any errors. We're going to keep it simple and install a package called express-async-handler that will do this for us.
npm i express-async-handler
Now, bring that into userController.js so that we can use it with our functions.
import asyncHandler from 'express-async-handler';
Now, add the asyncHandler to the authUser function.
const authUser = asyncHandler(async (req, res) => {
  res.json({ message: 'Success' });
});
This will allow us to use async/await in the function and if there is an error, it will be passed to our custom error handler, which we'll create now.
Custom Error Handler
Create a folder called middleware in backend and then create a file called errorMiddleware.js in there. This will contain our custom error handler.
const notFound = (req, res, next) => {
  const error = new Error(`Not Found - ${req.originalUrl}`);
  res.status(404);
  next(error);
};

const errorHandler = (err, req, res, next) => {
  let statusCode = res.statusCode === 200 ? 500 : res.statusCode;
  let message = err.message;

  // If Mongoose not found error, set to 404 and change message
  if (err.name === 'CastError' && err.kind === 'ObjectId') {
    statusCode = 404;
    message = 'Resource not found';
  }

  res.status(statusCode).json({
    message: message,
    stack: process.env.NODE_ENV === 'production' ? null : err.stack,
  });
};

export { notFound, errorHandler };
We are creating two middleware functions. The first one will be used as a catch-all for any routes that don't exist. The second one will be used as a catch-all for any errors that occur in our routes.
So this will allow us to throw an error from any controller function and have it passed to our custom error handler middleware, which will then respond with the appropriate status code and message.
We are also checking for a specific type of error, which is the Mongoose CastError. This is the error that is thrown when an invalid ID is passed to a Mongoose query. We are checking for this and if it occurs, we are setting the status code to 404 and the message to "Resource not found".
This snippet of code is very useful and I use it in most of my Node projects.
Now we have to bring the functions into server.js and use them. Add the following to the top of the file.
import { notFound, errorHandler } from './middleware/errorMiddleware.js';
Now, add the following to the bottom of the file, after the routes.
app.use(notFound);
app.use(errorHandler);
Add The Rest Of The Routes
Now that we have our error handler setup, we can add the rest of the controller functions and routes. In userController.js add the following code.
import asyncHandler from 'express-async-handler';

// @desc    Auth user & get token
// @route   POST /api/users/auth
// @access  Public
const authUser = asyncHandler(async (req, res) => {
  res.send('auth user');
});

// @desc    Register a new user
// @route   POST /api/users
// @access  Public
const registerUser = asyncHandler(async (req, res) => {
  res.send('register user');
});

// @desc    Logout user / clear cookie
// @route   POST /api/users/logout
// @access  Public
const logoutUser = (req, res) => {
  res.send('logout user');
};

// @desc    Get user profile
// @route   GET /api/users/profile
// @access  Private
const getUserProfile = asyncHandler(async (req, res) => {
  res.send('get profile');
});

// @desc    Update user profile
// @route   PUT /api/users/profile
// @access  Private
const updateUserProfile = asyncHandler(async (req, res) => {
  res.send('update profile');
});

export {
  authUser,
  registerUser,
  logoutUser,
  getUserProfile,
  updateUserProfile,
};
All we are doing here is sending back a string for now. We will add the actual functionality later.
Add The Routes
Now open the userRoutes.js file and add the following code.
import express from 'express';
import {
  authUser,
  registerUser,
  logoutUser,
  getUserProfile,
  updateUserProfile,
} from '../controllers/userController.js';

const router = express.Router();

router.post('/', registerUser);
router.post('/auth', authUser);
router.post('/logout', logoutUser);
router.route('/profile').get(getUserProfile).put(updateUserProfile);

export default router;
Now all of the routes should work and just respond with the string that we added to the controller functions. Go ahead and test them out in Postman. Make sure that you have the correct HTTP method selected for each route.
Database Setup
Now we are going to setup our database. We will be using MongoDB Atlas, which is a cloud database service. You can install MongoDB locally, but I prefer Atlas because it's easy to setup and use.
Create a MongoDB Atlas Account
Go to https://www.mongodb.com/cloud/atlas and click on the Start Free button. Go through the steps to create an account and confirm your email address.
Once you have created your account, log in and and create a database/cluster. It may ask you to create an organization and a project. If so, do that first and name it whatever you want.
Then you should be asked to create a database with a screen that looks like this:

Then you will see a screen asking which plan you want.
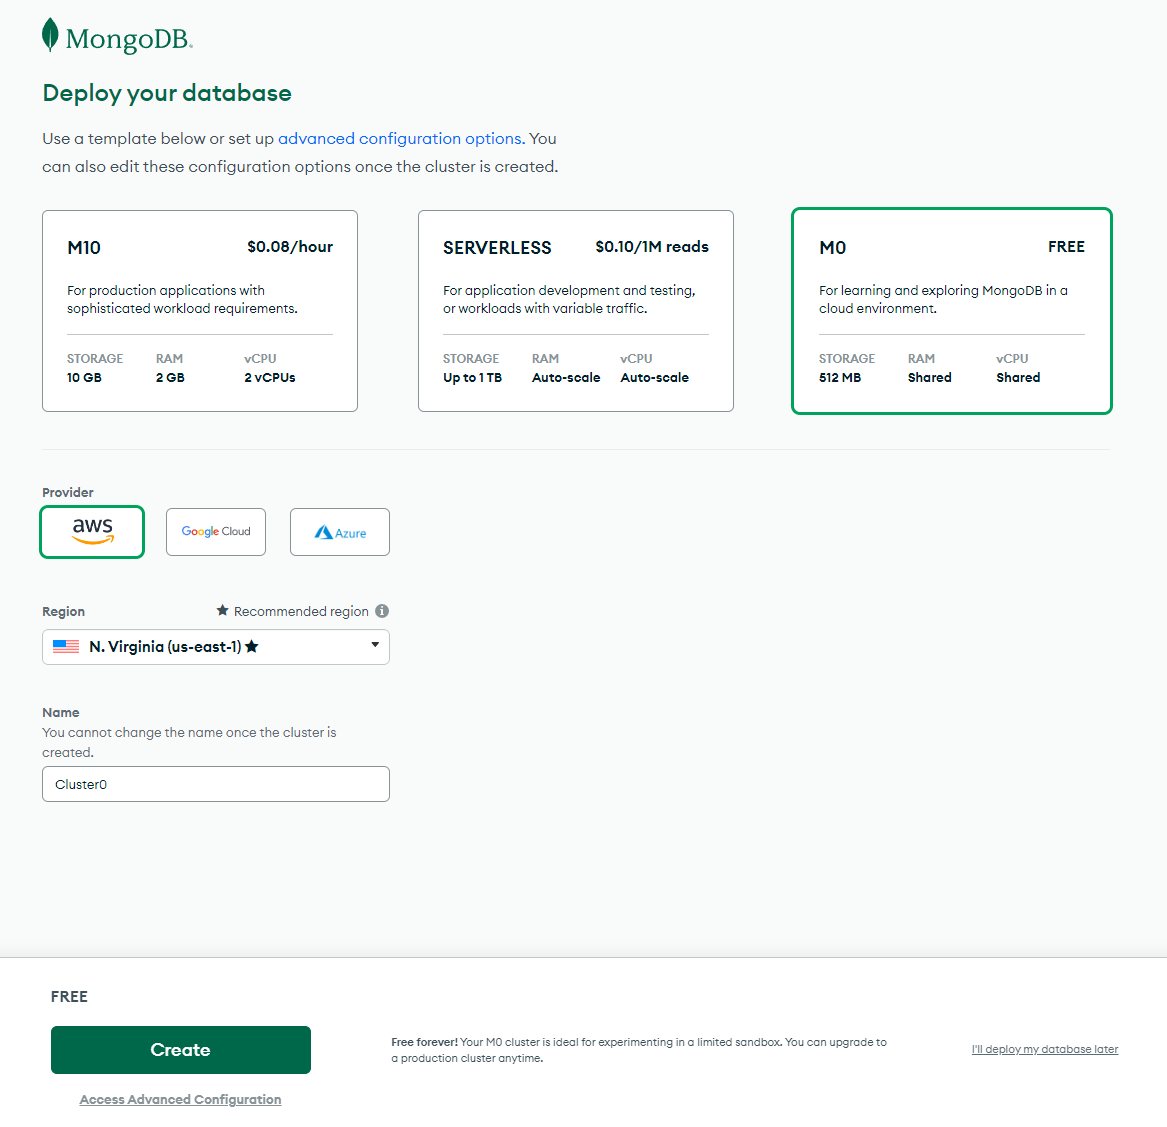
Chose the free M0 plan. Leave AWS as the provider. You can change the cluster name and region if you want. Then hit "create".
Now you will be prompted to create a database user. This is the user that we will use to connect to the database. Be sure to click the "Create User" button.

Scroll down and click on "Add My IP Address". This will allow you to connect to the database from your computer. Then click on "Finish & Close"
Now you have a deployed database in the cloud.

Create a Database
We have a cluster, now let's create the actual database that will store our collections. Click on "Browse Collections" and then "Add My Own Data".
Enter a database name. I will use "mernauth". Then add a collection named "users".
You can manage data from here, but I wouldn't recommend it. Instead, you can use MongoDB Compass, which is a desktop app.
Connection String
Now we need to get the connection string for our database. Click on the "Connect" button and then "Connect Your Application".
Copy the connection string:
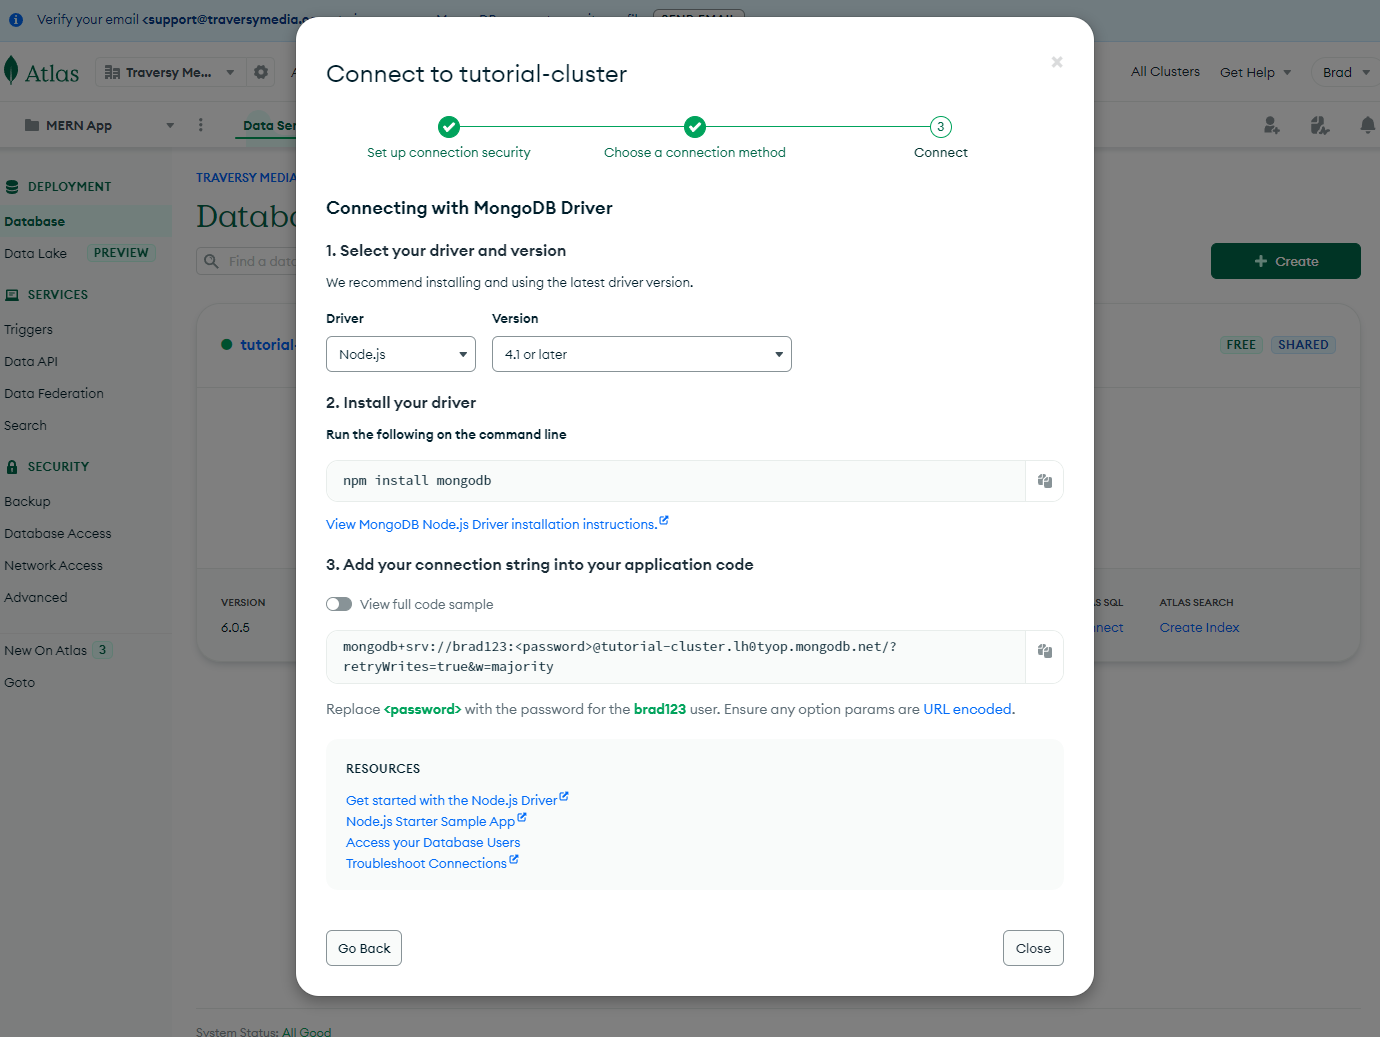
Now, open your .env file and add the following line:
MONGO_URI=<your connection string>
There are a couple things to change in the connection string. First, replace <password> with the password you created for the database user. Second, you need to add your database name. I used the name "mernauth" so I will add that to the end of the connection string. It should look like this:
mongodb+srv://brad123:brad123@tutorial-cluster.lh0tyop.mongodb.net/mernauth?retryWrites=true&w=majority
So my .env file will look like this:
NODE_ENV=development
PORT=5000
MONGO_URI=mongodb+srv://brad123:[email protected]/mernauth?retryWrites=true&w=majority
Remember to add the .env file to your .gitignore file if you have not done so. Otherwise, you will be sharing your database password with the world.
Connect To The Database
Now we need to connect to the database. We will be using mongoose for that, which we already installed. Create a new directory named 'config' and add a file named db.js to it. Then add the following code.
import mongoose from 'mongoose';

const connectDB = async () => {
  try {
    const conn = await mongoose.connect(process.env.MONGO_URI);
    console.log(`MongoDB Connected: ${conn.connection.host}`);
  } catch (error) {
    console.error(`Error: ${error.message}`);
    process.exit(1);
  }
};

export default connectDB;
This is a pretty standard way to connect to a MongoDB database using mongoose. We are using an async function so we can use await to wait for the connection to be made. If there is an error, we want to exit the process. Otherwise, we want to log the host that we are connected to.
Now we can import this file in server.js and call the connectDB function.
import connectDB from './config/db.js';

const port = process.env.PORT || 5000; // Run under this line...

connectDB();
You should now see the message "MongoDB Connected" in the console when you run the server.
User Model
With Mongoose, we need to create a model for all of the resources in our data, which for us is just the user model. Create a new directory named models in the backend directory and add a file named userModel.js to it. Then add the following code.
import mongoose from 'mongoose';

const userSchema = mongoose.Schema(
  {
    name: {
      type: String,
      required: true,
    },
    email: {
      type: String,
      required: true,
      unique: true,
    },
    password: {
      type: String,
      required: true,
    },
  },
  {
    timestamps: true,
  }
);

const User = mongoose.model('User', userSchema);

export default User;
Our user model is pretty simple. We have a name, email, and password. We also have timestamps for when the user was created and updated. In the eCommerce course, we do have an isAdmin field, but we don't need that here.
Register Route
Now that we have our database connected and we have a user model, let's start on our first route/controller function, which will be to register a user. Open userController.js and import the User model.
import User from '../models/userModel.js';
Then add the following to the registerUser function.
const registerUser = asyncHandler(async (req, res) => {
  const { name, email, password } = req.body;

  const userExists = await User.findOne({ email });

  if (userExists) {
    res.status(400);
    throw new Error('User already exists');
  }

  const user = await User.create({
    name,
    email,
    password,
  });

  if (user) {
    res.status(201).json({
      _id: user._id,
      name: user.name,
      email: user.email,
    });
  } else {
    res.status(400);
    throw new Error('Invalid user data');
  }
});
Here we are getting the name, email, and password from the request body. Then we are checking to see if a user with that email already exists. If so, we are throwing an error. If not, we are creating the user and returning the user data.
Request Body Parser Middleware
In order to be able to get the data from the request body, we need to add some middleware to server.js. Add the following code to server.js right before the routes.
app.use(express.json());
app.use(express.urlencoded({ extended: true }));
Hashing Passwords
Right now, if we make a request with Postman and send an email and password, it will store the password in plain text in the database. We don't want that. We want to hash the password before storing it in the database. We will be using the bcryptjs package for that.
There are a few ways that we can do this. We can do it here in the controller, but I prefer to do it in the model. So open userModel.js and add the following code.
import bcrypt from 'bcryptjs';
Then add the following code to the userSchema.
// Encrypt password using bcrypt
userSchema.pre('save', async function (next) {
  if (!this.isModified('password')) {
    next();
  }

  const salt = await bcrypt.genSalt(10);
  this.password = await bcrypt.hash(this.password, salt);
});
This will run right before the user is saved in the database. We create a salt, which is a random string of characters, and then we hash the password with the salt. The higher the number, the more secure the password will be, but it will also take longer to hash. 10 is a good number to use.
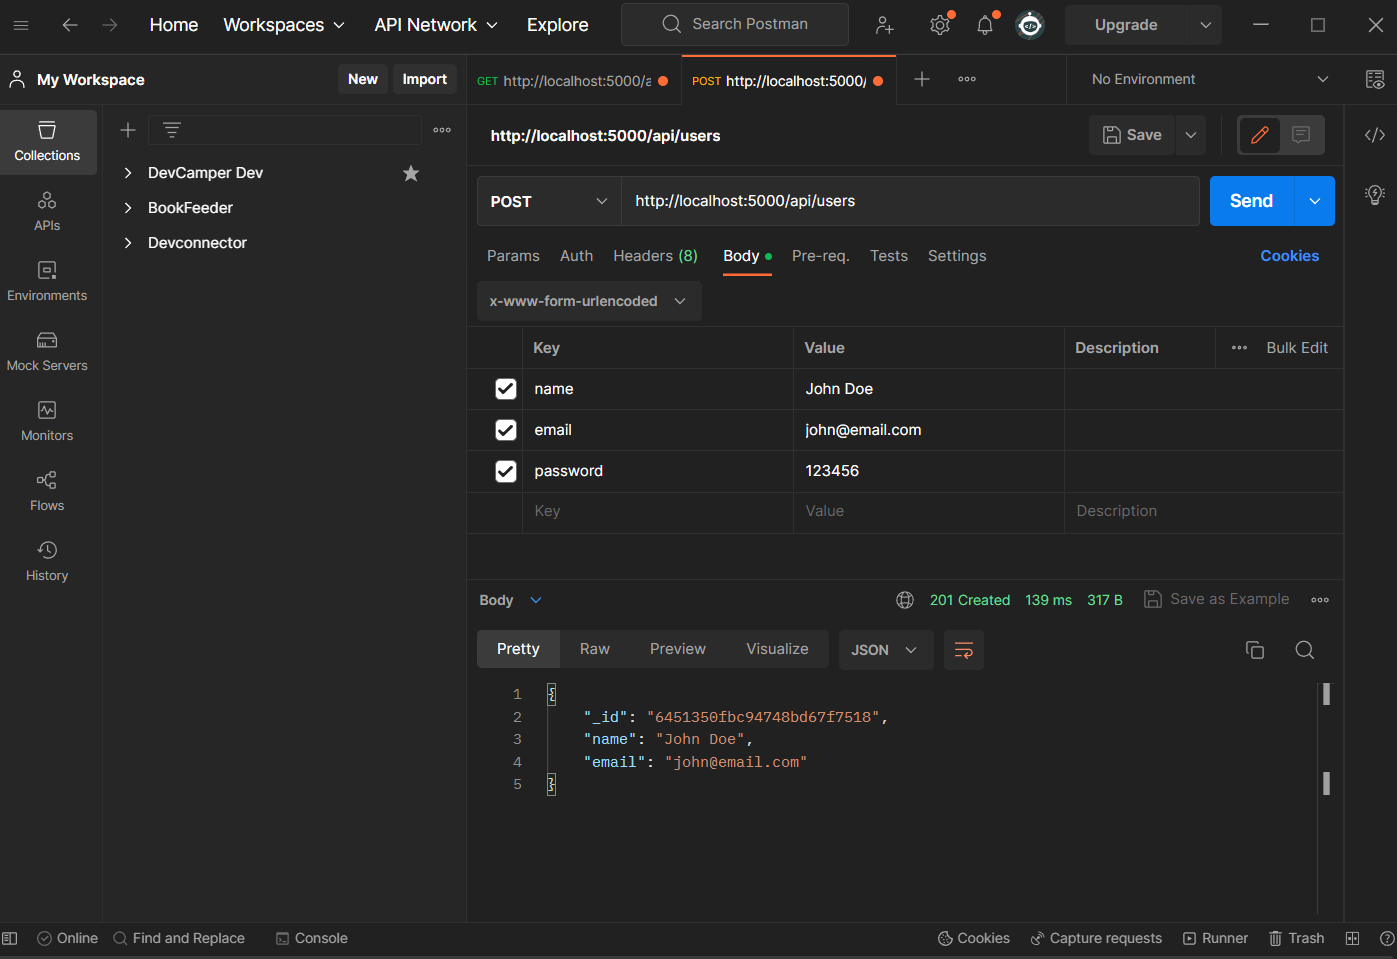
Test The Route
Open Postman and make a POST request to the route 'http://localhost:5000/api/users` and add the following body data:
{
  "name": "John Doe",
  "email": "[email protected]",
  "password": "123456"
}
You should get back a 201 status code and the user data.
Now we can register a user and store the hashed password in the database. You can check the database by logging into Atlas or Compass.
JSON Web Tokens
So right now, we just get back our user's data. We need a way to authenticate and check the user, so that we can protect specific routes. We are going to use JSON Web Tokens for that. You should already have the jsonwebtoken package installed if you have been following along. If not, install it now.
npm install jsonwebtoken
We need to generate a new token and save it in an HTTP-only cookie. We can do that in this file, but we have to do the same thing with the login route, so I am going to put that functionality into a utility file.
Create a folder named utils in the backend directory and add a file named generateToken.js to it. Then add the following code.
import jwt from 'jsonwebtoken';

const generateToken = (res, userId) => {
  const token = jwt.sign({ userId }, process.env.JWT_SECRET, {
    expiresIn: '30d',
  });

  res.cookie('jwt', token, {
    httpOnly: true,
    secure: process.env.NODE_ENV !== 'development', // Use secure cookies in production
    sameSite: 'strict', // Prevent CSRF attacks
    maxAge: 30 * 24 * 60 * 60 * 1000, // 30 days
  });
};

export default generateToken;
We are using the jwt.sign() method to create the token. The first argument is the payload, which is the user id. The second argument is the secret, which we will add to the .env file. The third argument is the options, which is the expiration date. I'm setting it to 30 days, however you may want to set it to something shorter. Then we are setting the cookie with the token.
In your .env file, add the following:
JWT_SECRET=abc123
Your secret can be anything you want.
Now, let's bring the utility file into the controller and use it:
import generateToken from '../utils/generateToken.js';
Then call it right after we check for the user and right before we send the response:
generateToken(res, user._id);
We pass in the res and the user._id, which gets added to the payload of the token.
Try and register a new user. If you are using Compass or Atlas, you can delete the john user and register that same user or just create a new one.
Once you register, you should see the cookie in the response headers as well as in Postman.
Now, that token should be sent with every request. So we need a middleware function that will check for the token and decode it to get the user id.
Create a new file in the middleware folder named authMiddleware.js and add the following code:
import jwt from 'jsonwebtoken';
import asyncHandler from 'express-async-handler';
import User from '../models/userModel.js';

const protect = asyncHandler(async (req, res, next) => {
  let token;

  token = req.cookies.jwt;

  if (token) {
    try {
      const decoded = jwt.verify(token, process.env.JWT_SECRET);

      req.user = await User.findById(decoded.userId).select('-password');

      next();
    } catch (error) {
      console.error(error);
      res.status(401);
      throw new Error('Not authorized, token failed');
    }
  } else {
    res.status(401);
    throw new Error('Not authorized, no token');
  }
});

export { protect };
So what we are doing here is getting the token from the cookie. Then we are checking to see if there is a token. If so, we are verifying the token and getting the user id from the payload. Then we are finding the user by id and attaching the user to the request object. Then we call next() to move on to the next middleware function. If there is no token, we are throwing an error.
Cookie Parser Middleware
This is important. We are accessing the cookie using req.cookies.jwt. In order to do that, we need to add the cookie-parser middleware. Make sure you have it installed. If not, install it now.
npm install cookie-parser
Then bring it into the server.js file and use it:
import cookieParser from 'cookie-parser';

app.use(cookieParser());
Now, we can bring the protect middleware into our routes file and use it to protect whichever routes we want. Let's protect the get profile and profile routes.
Open userRoutes.js and add the following code:
import { protect } from '../middleware/authMiddleware.js';
Then add protect as the first argument to the getProfile and updateProfile routes.
router
  .route('/profile')
  .get(protect, getUserProfile)
  .put(protect, updateUserProfile);
What this will do is make it so if we try and access these routes without a token, we will get an error. So let's test it out.
Right now we have the cookie, which means we can access the protected routes in Postman. GO ahead and make a GET request to the http://localhost:5000/api/users/profile route. You should get back the string.
Now, go into the browser, where you do not have the cookie and try and access the same route. You should get back an error.
Auth Route
So now we can protect routes and register users. Let's work on the route/function to authenticate existing users.
Open the userController.js file and go to the authUser function and add the following code:
const authUser = asyncHandler(async (req, res) => {
  const { email, password } = req.body;

  const user = await User.findOne({ email });

  if (user && (await user.matchPassword(password))) {
    generateToken(res, user._id);

    res.json({
      _id: user._id,
      name: user.name,
      email: user.email,
    });
  } else {
    res.status(401);
    throw new Error('Invalid email or password');
  }
});
This is very similar to the register route, except instead of adding a new user to the database, we are checking to see if the user exists and if the password matches. If so, we are generating a token and sending back the user data.
Compare Passwords
Remember, the database password is hashed, so we need to compare the hashed password with the password that the user sends in the request. We are checking with a method user.matchPassword(). We need to create that method on the user object. We can do that in the model.
Open the userModel.js file and add the following code:
userSchema.methods.matchPassword = async function (enteredPassword) {
  return await bcrypt.compare(enteredPassword, this.password);
};
This is a method that we can call on the user object. It takes in the password that the user sends in the request and compares it to the hashed password in the database. It returns a promise, so we need to use await.
Test The Route
Right now, we are "logged in" as the john user because we have the cookie/jwt set. We can remove the cookie in postman, by clicking on the "cookies" tab and removing the "jwt" cookie. Now we are essentially logged out. If you try and access the profile route, you will get an error.
Now let's try and log in. Make a POST request to the http://localhost:5000/api/users/auth route with whatever user you created. Use the wrong password at first. You should get an error. Now use the correct one. For me, it's:
{
  "email": "[email protected]",
  "password": "123456"
}
You should get back the user data and the cookie in the response headers.
We can now register and log in. Now let's add the logout functionality.
Logout Route
We already have a function called logoutUser in the userController.js file. Add the following to that function:
const logoutUser = (req, res) => {
  res.cookie('jwt', '', {
    httpOnly: true,
    expires: new Date(0),
  });
  res.status(200).json({ message: 'Logged out successfully' });
};
This will clear the cookie and send back a message. Try it out by making a POST request to the http://localhost:5000/api/users/logout route. You should get back the message and the cookie should be cleared.
Get User Profile Routes
Now that we have the authentication routes set up, let's work on the user profile routes.
Add the following to the getUserProfile function int the userController.js file:
const getUserProfile = asyncHandler(async (req, res) => {
  if (req.user) {
    res.json({
      _id: req.user._id,
      name: req.user.name,
      email: req.user.email,
    });
  } else {
    res.status(404);
    throw new Error('User not found');
  }
});
Since this route uses the protect middleware, we have access to the user object on the request object. We can use that to get the user from the database and send back the user data.
Make sure you are logged in and make a GET request to the http://localhost:5000/api/users/profile route. You should get back the user data.
Update User Profile Route
The last thing we want to do is make it so that users can update their profile. Let's add the following to the updateUserProfile function in the userController.js file:
const updateUserProfile = asyncHandler(async (req, res) => {
  const user = await User.findById(req.user._id);

  if (user) {
    user.name = req.body.name || user.name;
    user.email = req.body.email || user.email;

    if (req.body.password) {
      user.password = req.body.password;
    }

    const updatedUser = await user.save();

    res.json({
      _id: updatedUser._id,
      name: updatedUser.name,
      email: updatedUser.email,
    });
  } else {
    res.status(404);
    throw new Error('User not found');
  }
});
We are getting the user from the database and updating the name and email. If the user sends a new password, we are updating that as well. We are then saving the user and sending back the updated user data.
Make sure you are logged in and make a PUT request to the http://localhost:5000/api/users/profile route with the following data:
{
  "name": "John Update",
}
This should update your user's name.
Now you can move on to part 2 and implement the frontend.
Stay connected with news and updates!
Join our mailing list to receive the latest news and updates from our team.
Don't worry, your information will not be shared.
We hate SPAM. We will never sell your information, for any reason.
